Homemade Kimchi Recipe
Kimchi is one of those things I can happily stand at the fridge eating straight from the container.
It is crunchy, salty, garlicky, properly spicy, and gets that sharp fermented bite that makes plain rice suddenly seem like a very good dinner.
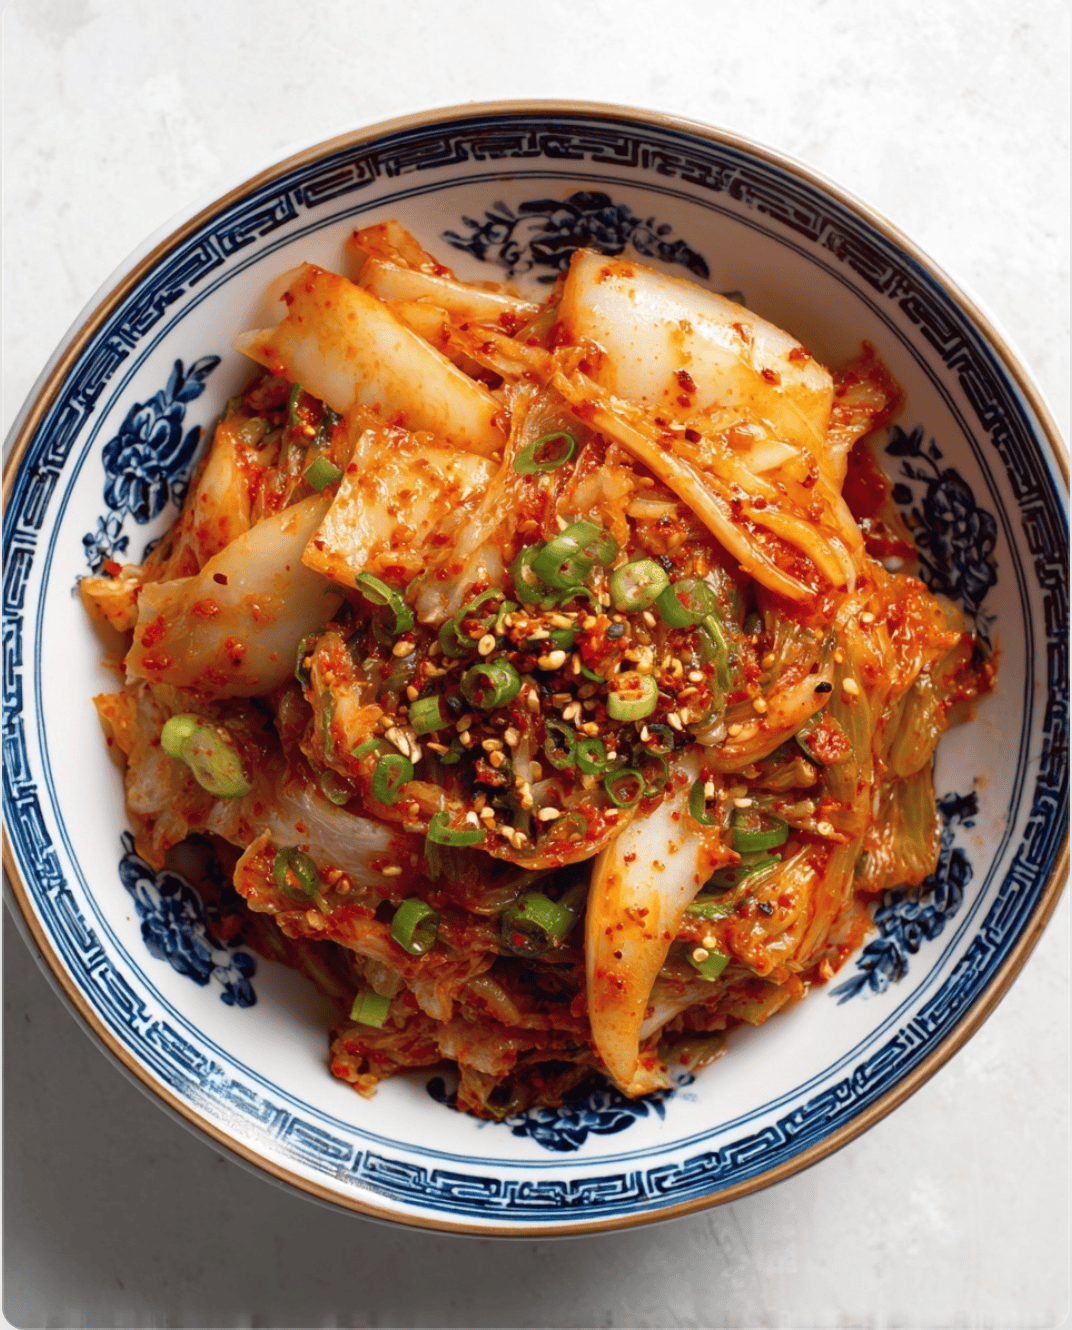
For this version, I’m keeping the cabbage in fairly chunky pieces rather than shredding it finely.
That way you still get those thick white stems with plenty of crunch alongside the softer leafy parts.
The cabbage is coated in a bright red chilli mixture with garlic, ginger, spring onions and a little sweetness to round everything out.
I also like finishing it with sliced spring onions and sesame seeds when serving.
You can eat some fairly soon after making it if you like a fresher, crunchier kimchi.
Give it a few days in the fridge, though, and the flavour changes completely.
It becomes tangier, deeper and a little funkier, which is exactly what I want next to a bowl of hot rice.
Page Contents
ToggleWhy You’ll Love This Recipe
- The cabbage stays crunchy rather than turning limp.
- It has plenty of chilli without tasting like nothing but heat.
- Garlic, ginger and spring onions give the seasoning loads of flavour.
- You can decide how fermented you want it.
- It keeps well in the fridge and actually becomes more interesting as it sits.
- A little bowl goes with rice, noodles, fried eggs, dumplings and so many other meals.
- You can make a generous batch without needing any complicated equipment.
Ingredients
This makes roughly 1 large jar of kimchi.
For the cabbage
- 1 large napa cabbage, about 1.2 to 1.5kg
- 60g coarse sea salt
- Cold water, as needed
For the chilli mixture
- 5 tablespoons Korean chilli flakes, or gochugaru
- 4 garlic cloves
- 1 tablespoon finely grated fresh ginger
- 3 tablespoons fish sauce
- 1 tablespoon sugar
- 2 tablespoons rice vinegar
- 3 tablespoons water
- 4 spring onions, thinly sliced
- 1 small carrot, finely shredded, optional
For serving
- Extra sliced spring onions
- Toasted sesame seeds
- A pinch of extra chilli flakes, if you like
A Quick Note About the Chilli
Gochugaru really does make a difference here.
It has a fruity, slightly smoky chilli flavour and gives kimchi that rich red colour without making it brutally hot.
I would not swap it for the same amount of cayenne unless you are actively trying to ruin your afternoon.
If you like your kimchi milder, start with 3 tablespoons.
For something with a stronger kick, use all 5.
Preparing the Cabbage
Start by removing any damaged outer leaves from the napa cabbage.
Cut the cabbage lengthways into quarters, then chop it into fairly chunky pieces.
I keep the thick white sections larger because they stay beautifully crisp after salting.
Put all of the cabbage into a very large bowl.
Sprinkle the salt over it in stages, tossing as you go so it reaches the leaves as evenly as possible.
Add just enough cold water to lightly wet everything.
You are not trying to make cabbage soup.
Leave it for about 1 1/2 to 2 hours, turning the cabbage every 30 minutes.
As it sits, the cabbage will soften slightly and release quite a bit of water.
The thick pieces should bend without snapping, but they should still have some bite.
Rinse the Cabbage Well
Once the cabbage has softened, drain it.
Rinse it thoroughly under cold water about 3 times.
This bit matters.
If you barely rinse it, the finished kimchi can be unpleasantly salty.
After the final rinse, leave the cabbage in a colander for about 20 to 30 minutes.
You want as much excess water to drain away as possible.
Make the Kimchi Seasoning
While the cabbage drains, make the chilli mixture.
Add the garlic, ginger, fish sauce, sugar, rice vinegar and water to a bowl.
Stir until the sugar has mostly dissolved.
Add the gochugaru and mix again.
It should turn into a loose red paste.
Not watery, but not so thick that you struggle to spread it over the cabbage either.
Stir in the sliced spring onions.
If you are using shredded carrot, add that now too.
Taste a tiny bit.
It should be salty, garlicky, spicy and slightly sweet.
It will taste stronger at this stage than it does once mixed through all that cabbage.
Mix Everything Together
Put the drained cabbage into a large clean bowl.
Add the chilli mixture.
Now get in there and toss everything together properly.
I usually wear food-safe gloves for this because gochugaru has an impressive ability to find the tiniest cut on your hand.
Massage the seasoning gently between the cabbage leaves and over the thick stems.
You want the pieces coated rather than absolutely plastered.
There should still be plenty of white and pale-green cabbage showing underneath that red seasoning.
Once everything looks evenly mixed, you are ready to pack it into a jar.
Packing the Kimchi
Use a very clean glass jar with enough room to hold the kimchi without cramming it right to the lid.
Add the cabbage in handfuls.
Press it down gently as you go.
You want to remove large air pockets, but do not mash the life out of it.
Leave at least 2 to 3cm of space at the top of the jar.
Fermentation creates gas, and kimchi has absolutely no respect for an overfilled container.
Press the cabbage down once more so some liquid begins to rise around it.
Wipe the rim clean and put the lid on loosely.
Fermenting the Kimchi
You have a couple of options here.
For a fresher, crunchier kimchi, you can refrigerate it almost immediately.
It will still slowly ferment in the fridge.
For a stronger fermented flavour, leave the jar at room temperature for about 1 to 2 days.
Put the jar on a plate or tray because bubbling liquid can occasionally escape.
Once or twice a day, open the lid briefly to release built-up gas.
You may start noticing little bubbles forming between the cabbage pieces.
That is completely normal.
Give it a taste after the first day.
When it has the amount of tang you like, move it into the fridge.
What Good Kimchi Should Taste Like
There is no single exact moment when kimchi becomes “done.”
It depends on how you like it.
At the beginning, the cabbage tastes fresher and crunchier.
The chilli and garlic are much more noticeable too.
After a few days, the flavours begin to settle down and the acidity becomes stronger.
Leave it longer and you get something much more sour and funky.
That older kimchi is brilliant for cooking.
I actually keep younger kimchi for eating straight from the jar and save the stronger stuff for fried rice, noodles and stews.
How Long Does Kimchi Keep?
Properly refrigerated kimchi can keep for several weeks.
The flavour will continue to change the entire time.
It will become softer and noticeably more sour as it ages.
That does not automatically mean it has gone bad.
Fermentation is the whole point here.
Always use a clean utensil when taking kimchi from the jar.
It helps keep unwanted bacteria out and gives your batch a much better chance of lasting well.
What to Serve With Kimchi
This is where kimchi becomes dangerously useful.
Put it next to:
- Steamed white rice
- Fried rice
- Noodles
- Dumplings
- Grilled beef
- Korean-style chicken
- Fried eggs
- Rice bowls
- Stir-fried tofu
- Ramen
Honestly, even rice, a fried egg and a pile of kimchi is a meal I would happily eat.
It does not need much help.
Kimchi Fried Rice
Once your kimchi has become noticeably sour, do not throw it away.
Make fried rice.
Chop the kimchi roughly and fry it in a little sesame oil.
Add cooked cold rice and a spoonful of kimchi liquid from the jar.
Add soy sauce, spring onion and maybe a little gochujang.
Top the whole thing with a fried egg.
It is one of the best things you can do with older kimchi and takes hardly any time.
Can I Make It Less Spicy?
Absolutely.
Use about half the gochugaru.
The kimchi will still ferment normally and you will still get plenty of garlic, ginger and tang.
I would not remove the chilli entirely because it is a big part of the flavour.
But you definitely do not need to make it painfully hot.
Kimchi should taste good before it makes you sweat.
Can I Make It Without Fish Sauce?
Yes.
For a vegetarian version, replace the fish sauce with soy sauce or tamari.
The flavour will be slightly different, but it still works.
You may need a little extra salt depending on the soy sauce you use.
Taste the seasoning mixture before adding it to the cabbage and adjust from there.
Why Is My Kimchi Bubbling?
Because it is alive and busy.
During fermentation, naturally occurring bacteria produce gases.
Those little bubbles are usually a good sign that things are moving along.
The smell also becomes stronger.
Expect something sour, garlicky and fermented.
What you do not want is fuzzy mould or clearly rotten smells.
If you see mould growing on the surface, discard the batch.
Q&A
What cabbage should I use?
Napa cabbage is the best choice for this style of kimchi.
It has thick crunchy stems and softer leaves that absorb the chilli mixture really well.
Do I have to ferment it at room temperature?
No.
You can refrigerate it straight away.
It will simply ferment more slowly.
How soon can I eat it?
Technically, immediately.
Fresh kimchi is crunchy and delicious.
For a more fermented flavour, wait a few days.
Why is my kimchi too salty?
The cabbage may not have been rinsed thoroughly enough after salting.
Three good rinses usually does the trick.
Can I add sesame seeds?
Yes.
I prefer using them as a garnish when serving rather than adding loads to the jar itself.
Do I need a special fermentation jar?
No.
A clean glass jar works perfectly well.
Just leave some room at the top and release excess gas if necessary.
Can I freeze kimchi?
You technically can, but I would not bother.
Freezing changes the texture considerably.
Keep it refrigerated instead.
Final Thoughts
Kimchi does take a little waiting, but most of the actual work is easy.
You salt cabbage, mix up a fiery garlic-and-chilli paste, toss everything together, and then the jar takes over from there.
The first few days are the fun part because the flavour changes every time you taste it.
One day it is crisp and fresh.
A couple of days later it has that sharper fermented edge and suddenly tastes completely different.
I like serving it piled into a bowl with extra spring onions and sesame seeds over the top, especially when the cabbage still has plenty of crunch.
And once the jar gets properly sour, that is not the end of it.
That is when the fried rice phase begins, which may actually be my favourite part.